
Seamanship basics: ropes, knots and the boat · Level R1 · 4 parts · about 12 min
Rope handling: coiling, cleating, winches and throwing a line
4 short parts: Coiling · Cleats, clutches · Winches · Throwing a line. Each part explains the idea, then gives the points to remember, the common mistakes, a worked case and a practice question; the Academy unit adds all 24 check questions.
1 · Coiling
Coiling and flaking a rope so it runs free
A rope stowed well runs out without a tangle when you need it. Coil it, flake it or hang it, and always know where its ends are.
Words first
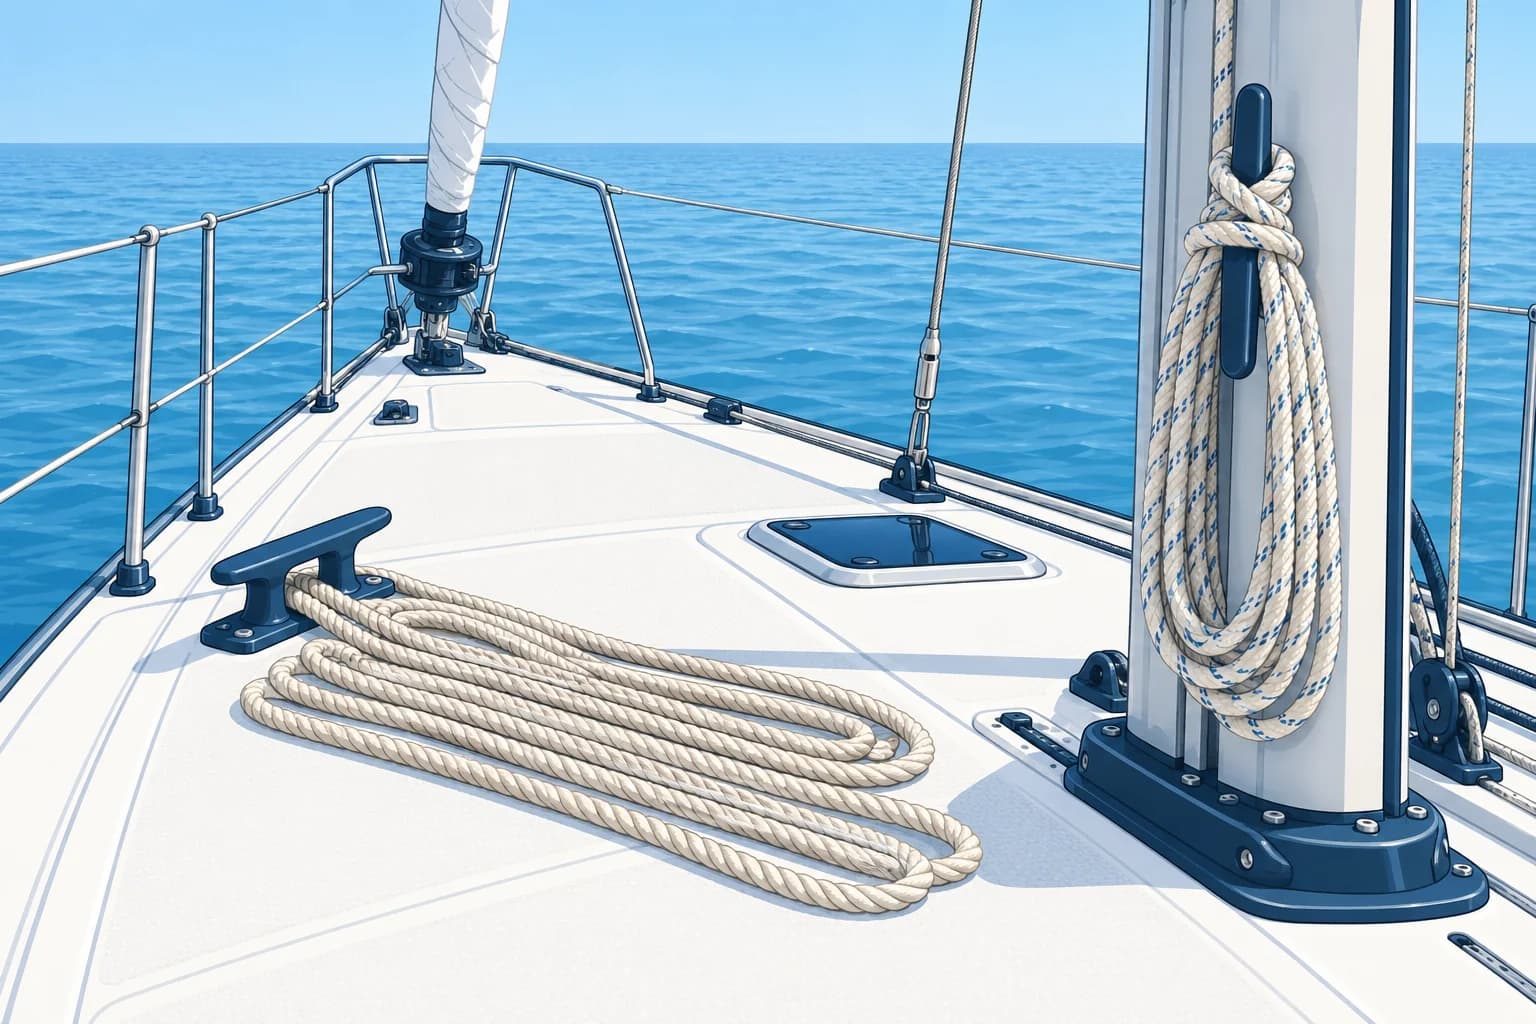
A rope with a job is a line. A sheet controls a sail; a halyard hoists it. A mooring line secures the boat. The working end is the end you handle; the standing part is the main length away from it. A bight is a U-shaped bend in the rope. Coiling makes loops; flaking lays a line back and forth so it runs freely.
Coiling
Hold the coil in one hand and make even loops with the other. A three-strand (twisted) rope is coiled clockwise, giving each loop a small twist so it lies flat. A braided rope fights twisting: coil it in figure-of-eight loops, or flake it. Start coiling from the end that is made fast (secured), so twists run out of the free end.
Flaking
Flaking down a rope on deck, in loose layers with no twists, lets it run out fast. Flake a mooring line before coming alongside, and a halyard before raising or lowering a sail. Put the length that will feed out first on top. When lowering a sail, this is the length leading to the cleat, the fitting that holds the line.
Hanging a halyard
Hang the coil on the cleat to keep the deck clear. A cleat horn is one of its projecting arms. Follow the procedure below, then undo the securing bight and flake the line before use.
Ends and safety
Secure or knot the free end of a halyard or sheet so it cannot run away out of reach: a stopper knot, such as a figure-of-eight, in a sheet's end stops it pulling through a block (pulley). Never stand inside a coil or bight on deck: if the line runs, it can catch your foot.
Key figures
- Three-strand
- Coil clockwise, a small twist in each loop
- Braided rope
- Figure-of-eight loops, or flake
- Stopper knot
- Figure-of-eight in a sheet's end
Coiling and hanging a halyard
- Make the halyard fast on its cleat first. — The load stays on the cleat, not on the coil.
- Coil from the cleat towards the free end. Use clockwise loops for three-strand rope and figure-of-eights for braid. — Twists run out of the free end and the loops lie flat.
- Leave a short length between cleat and coil. — You need it to hang the coil.
- Reach through the coil, pull a bight of that length through and twist it two or three times. — The twisted bight holds the coil together.
- Hook the twisted bight over a cleat horn. — The coil stays tidy and secure as the boat moves.
- Lift the coil off, undo the securing bight and flake the line clear. To ease (let out) a halyard, put the length leading to the cleat on top. — The line feeds towards the cleat without pulling through the pile.
Remember
- Coil three-strand clockwise; coil braid in figure-of-eights or flake it.
- Flake a line on deck before it has to run out fast.
- Coil from the made-fast end, so twists run out of the free end.
- Never stand inside a coil or bight on deck.
Common mistakes
Wrong: Coil braided rope in round loops like three-strand.
Right: Braid kinks and tangles that way. Use figure-of-eights or flake it.
Wrong: Drop the mooring line in a heap ready to throw.
Right: Flake it so it runs free; a heap tangles at the worst moment.
Worked case
You are about to come alongside. The bow line lies in a twisted heap in the locker, still coiled from last week. What do you do?
Show the answer
Take it out early, make one end fast on the bow cleat, lead it outside the guardrails and their posts and flake it on deck with the free end on top. Then it runs out cleanly when you step ashore or throw it. Do the same with the stern line, and keep your feet out of the bights.
Practice question
How should you coil a braided rope?
- In round loops, always turned clockwise
- In figure-of-eight loops, or flake it
- In round loops, always turned anticlockwise
- Wound tightly around your elbow and hand
Show the answer
Answer: B. Braid resists the twist that round coiling puts in, so it kinks. Figure-of-eights avoid that.
2 · Cleats, clutches
Cleats, clutches and making fast
Each fitting holds a rope in its own way. Know how to make fast and, just as important, how to let go safely under load.
Horn cleat
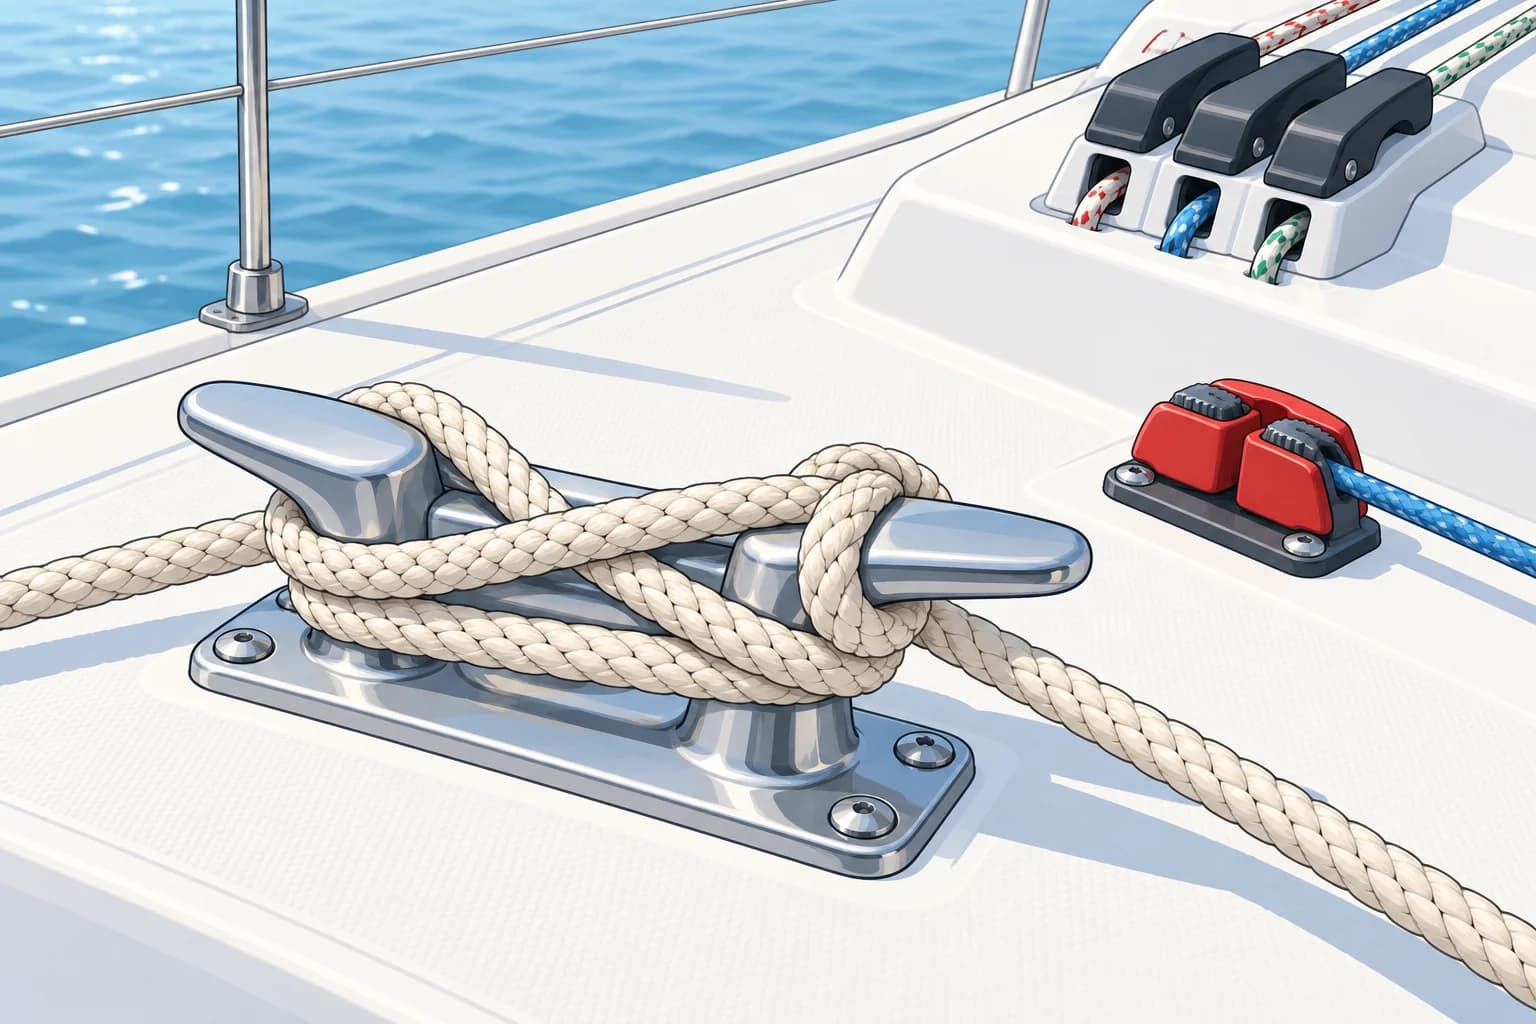
The horn cleat, with two horns, is the most common fitting for mooring lines and halyards. Make fast with a turn round the base, figure-of-eights over the horns and, if needed, one locking hitch, a final turn that locks the line. The step-by-step method is in the cleat hitch study in the Knots section. It can be let go under load.
Cam and clam cleats
A cam cleat has two spring-loaded toothed jaws; a clam cleat has fixed grooves. The rope is pulled in and jams. Pull it upward and out to release it. They are quick for small sheets and control lines, but a rope of the wrong size slips or will not come out.
Rope clutches
A rope clutch grips a halyard or control line with a lever, so one winch can serve several lines. Opening a loaded clutch can let the line run suddenly. First put the tail, the free end, around a winch drum, using enough turns to control the load. Wind the winch until it takes the load, then remove the handle. Open the clutch and ease under control. Follow the fitting's instructions.
Bollards and rings
A bollard is a strong mooring post; an eye is a fixed loop in a line. An eye can go over a bollard. When practical, pass a line around the bollard or through a mooring ring and bring its free end back aboard. Secure both ends aboard so you can adjust or release the line without going ashore.
Hands and loads
Never wrap a loaded line round your hand. Keep fingers away from where a line enters a cleat, clutch or fairlead (a fitting that guides the line). Use enough turns on the fitting to control the load; a winch may need several. Ease the tail slowly, keeping your hands clear.
Key figures
- Horn cleat
- Turn round base, figure-of-eights; locking hitch if needed
- Cam/clam cleat
- Quick jam; pull up and out to release
- Rope clutch
- Winch takes the load before you open it
Remember
- Horn cleat: turn round the base, figure-of-eights, one locking hitch if needed.
- Clutch: put the line on a winch and take the load before opening.
- Cam and clam cleats: quick, but only for the right rope size.
- Never wrap a loaded line round your hand.
Common mistakes
Wrong: Pile many locking hitches on a cleat to be safe.
Right: Use at most one locking hitch, only if needed. Extra locking hitches can jam and delay release.
Wrong: Flip open a clutch to drop the main quickly.
Right: Take the load on a winch first, or the halyard runs out and burns your hands.
Worked case
You need to ease the mainsail halyard a little to adjust tension along the sail's front edge. The halyard is in a rope clutch, under load, with the tail lying on the cabin roof.
Show the answer
Put enough clockwise turns on the winch to control the load. Wind until the winch takes the load, then remove the handle. Hold the tail securely before opening the clutch. Release the tail from any self-tailing jaws, which grip the free end, and ease it slowly, keeping turns on the drum and fingers clear. Close the clutch, ease the tail to check it holds, then remove the winch turns.
Practice question
How do you start making a line fast on a horn cleat?
- With a locking hitch first of all
- With a full turn round the base
- With a single figure-of-eight
- With a bowline over one horn
Show the answer
Answer: B. The turn round the base takes the load; figure-of-eights follow, with one locking hitch if needed.
3 · Winches
Using a winch safely
A winch multiplies your pull many times. Put the turns on clockwise, keep your fingers clear, and know how to ease and clear a riding turn.
How it works
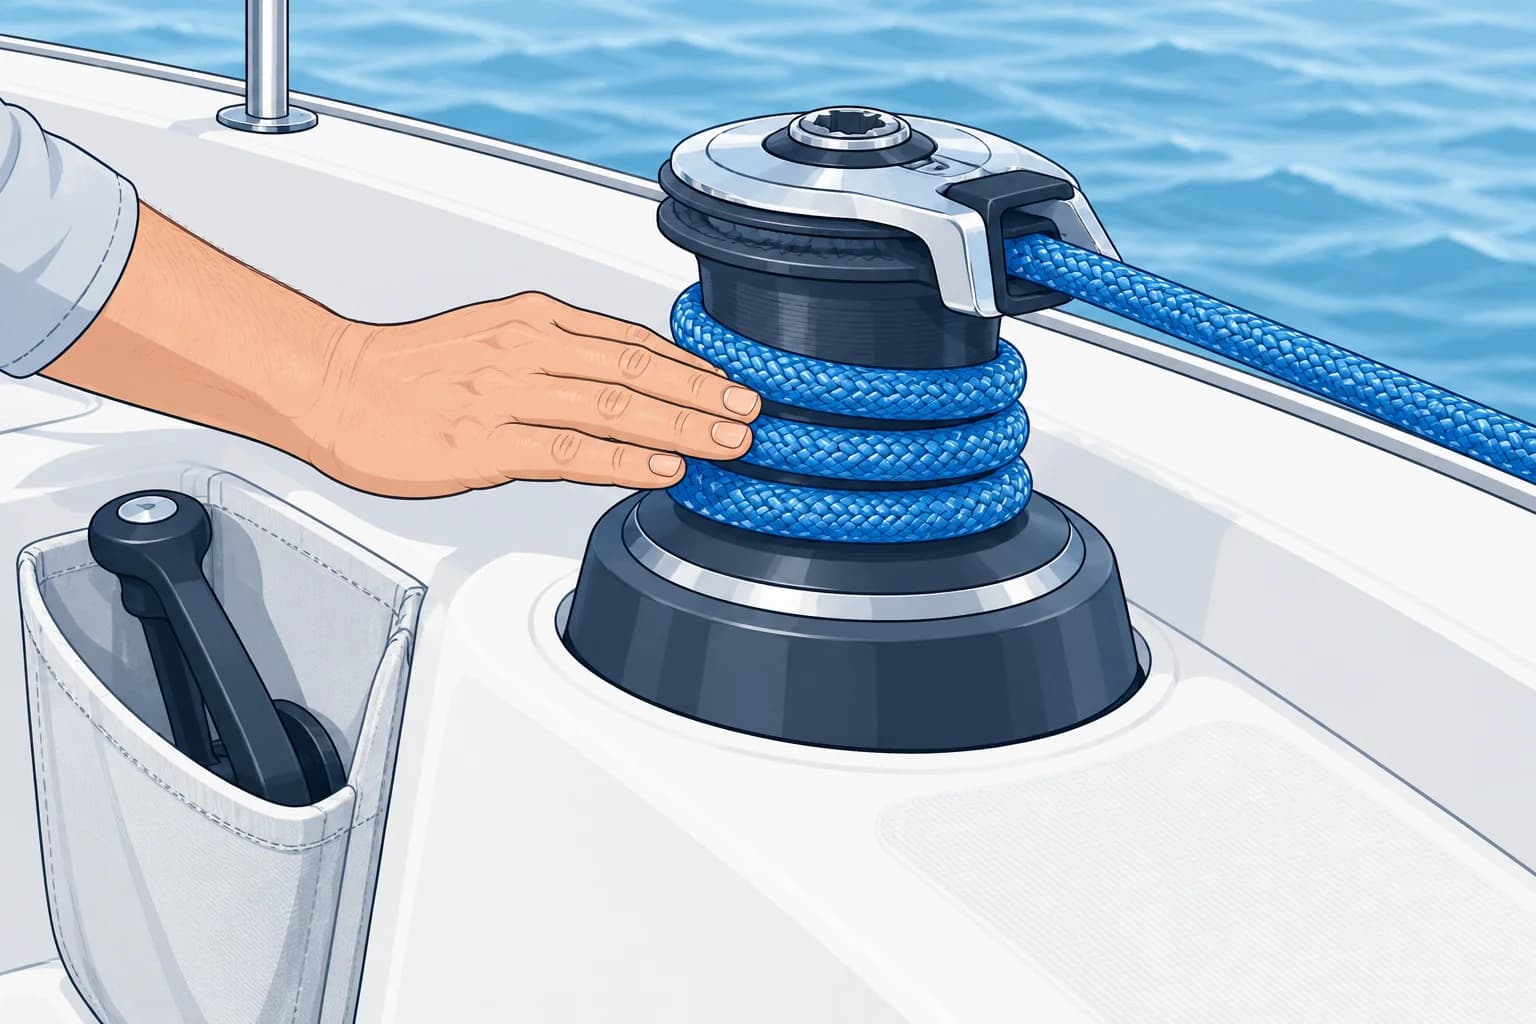
A winch is a drum turned by a handle or a motor. The rope goes round it; friction grips it. Almost all yacht winches turn clockwise seen from above, so turns go on clockwise. A ratchet stops the drum turning back. On a two-speed winch, turning the handle one way gives fast speed; turning it the other way gives more power.
Turns and tailing
Lead the line onto the bottom of the drum. Stack two or three clockwise turns upwards without crossing while the line is light; add turns as the load grows, often three or four. A tailer controls the free end while someone winds. A self-tailing winch grips the tail in grooved top jaws.
Easing
To ease a line is to let it out under control. Remove the handle. Keep enough turns on the drum to control the load. Hold the tail securely before releasing it from the self-tailing jaws or cleat. Feed the tail out slowly, letting the turns slip around the drum: this is surging. Keep fingers clear. Never lift loaded turns off the drum.
Riding turn
A riding turn happens when a loaded turn crosses another and jams. Stop winching. Ask the skipper to unload the sail safely, or transfer the load to a suitable second winch. Use a spare line attached to the loaded sheet with a rolling hitch, a knot that grips another line (see Knots). Clear the jam only when its turns are slack. Reload the original winch and transfer the load back before releasing the spare line.
Safety
Remove the winch handle after use: a spinning or loose handle injures. Keep fingers and hair away from the drum and the point where the line comes on. On an electric winch, keep watching the sail and stop the motor at once if anything jams or a person is caught.
Key figures
- Direction
- Turns go on clockwise, on almost all yacht winches
- Under load
- Usually three or four turns
- Riding turn
- Take the load off; rolling hitch to another winch
Winching in a sheet
- Lead the sheet onto the bottom of the drum. While it is light, add two or three clockwise turns, stacking upwards. — Few turns let you pull in slack fast by hand.
- Pull in by hand as far as you can, keeping your hands clear of the drum. — Hand pulling is faster than winding.
- Add turns as the load grows, then put the tail in the self-tailer or give it to a tailer. — More turns stop slipping under load.
- Fit the handle and wind. On a two-speed winch, use fast gear first, then power gear as the load grows. — Use the available gearing to match the load.
- Secure the tail on a cleat if the winch is not self-tailing. — Securing the tail holds the sheet without someone tailing it.
- Take the handle out and stow it. — A loose handle can fall overboard or hurt someone.
Remember
- Turns go on clockwise; add turns as the load grows.
- Control the tail and keep enough turns on the drum when easing.
- Clear a riding turn by taking the load off, not by winching harder.
- Remove the handle; stop an electric winch at once if anything jams.
Common mistakes
Wrong: Winch harder to free a riding turn.
Right: That tightens it. Take the load off the line first.
Wrong: Leave the handle in the winch for the next tack.
Right: A loose handle can spin, fall or break fingers. Stow it after use.
Wrong: Put five turns on before pulling in the slack.
Right: Start with two or three so slack comes in fast; add turns as it loads up.
Worked case
The sheet of a headsail, the sail ahead of the mast, jams on the winch with a riding turn. A shoal, an area of shallow water, lies ahead. You have a spare line and a second suitable winch.
Show the answer
Tell the skipper immediately: staying clear of the shoal comes first. The skipper must choose a safe course before you attempt repairs. Once safe, attach a spare line to the loaded sheet on the sail side of the jam with a rolling hitch. Take the load on another suitable winch until the jammed turns are slack. Clear and reload the original winch. Ease the spare line slowly to transfer the load back before removing it. Keep fingers clear.
Practice question
Which way do you put turns on a typical yacht winch?
- Anticlockwise seen from above
- Clockwise seen from above
- Either way; it does not matter
- Whichever way the sheet leads
Show the answer
Answer: B. On a typical clockwise yacht winch, reverse wraps let the drum turn with the loaded line, so it cannot hold the load properly.
4 · Throwing a line
Throwing a line and passing mooring lines
A good throw lands across the target the first time. Split the coil between your hands, throw underarm and keep the end aboard.
Prepare
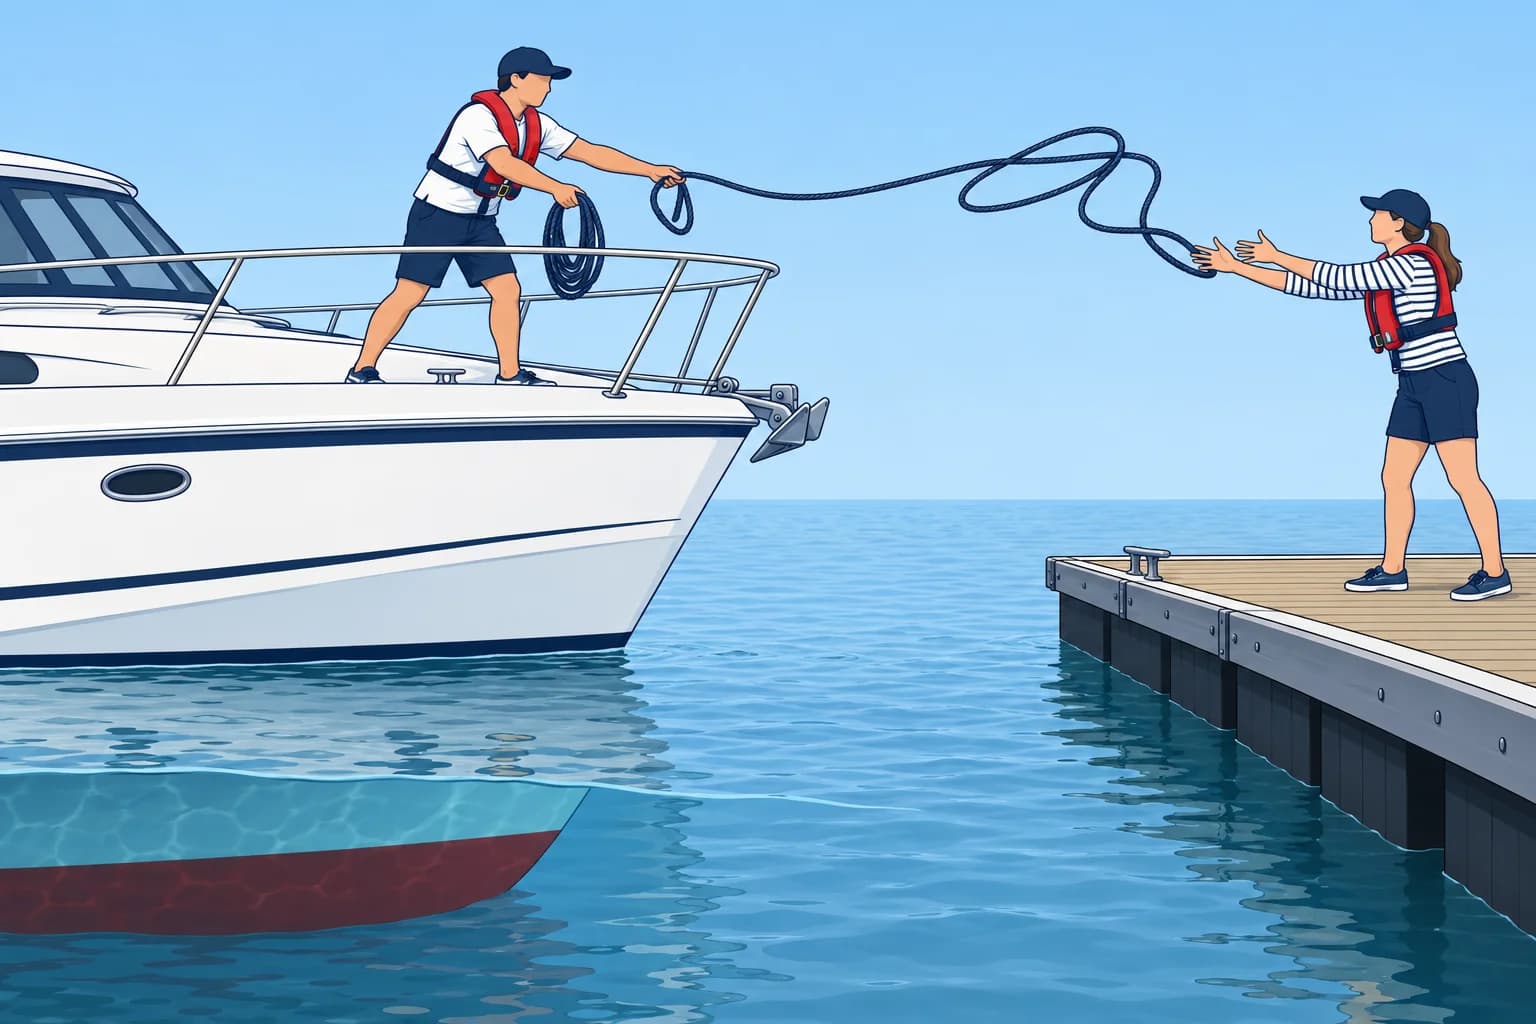
Coil the line again just before you throw it, so it is free of twists. Make the inboard end fast to a cleat before throwing, then keep your feet clear of the line. Let the person ashore or on the other boat know you are about to throw.
Split the coil
Divide the coil into two parts: about half in your throwing hand, the rest loose in your other hand, open so it pays out. Throw the first half underarm or with a smooth sidearm swing. The rest runs out after it.
Aim
With an ordinary unweighted mooring line, throw a little beyond and across the receiver, so the line falls across their outstretched arms. A short throw lands in the water and must be pulled back and coiled again. Allow for the wind: aim upwind of the person.
Heaving line and throw bag
A heaving line is a light line used to pass a heavy mooring line across a gap. Its throwing end has a rope knot or soft throwing weight; never add metal or other hard weights. Throw the weighted end into clear space beyond the receiver, away from their head. A throw bag holds floating line: hold the end and throw the bag. For rescue use, see Emergencies: man overboard.
Passing mooring lines
Do not jump ashore from a moving boat: it causes many injuries. Step off when the boat is alongside and stopped, or pass the line. Give a helper ashore the eye or loop, and keep the end aboard so you control it. Never throw a line near a turning propeller.
Key figures
- Before throwing
- Recoil, end made fast, warn the catcher
- Split the coil
- About half to throw, half to pay out
- Aim
- Beyond and upwind of the target
Remember
- Recoil, make the end fast and warn the catcher before you throw.
- Split the coil: throw one half, let the other half pay out.
- Aim beyond and upwind of the target.
- Do not jump ashore; step off when stopped or pass the line.
Common mistakes
Wrong: Throw the whole coil in one bundle.
Right: A bundle falls short and tangles. Split it so it pays out.
Wrong: Jump ashore as the boat comes in.
Right: Jumping causes falls and injuries. Wait until you can step off, or pass the line.
Worked case
Coming alongside a pontoon in a light offshore breeze, the boat stops 2 m off. A marina helper waits on the pontoon. You hold the coiled bow line.
Show the answer
Check the inboard end is made fast. Recoil and split the line, warn the helper, then throw the unweighted line underarm beyond and upwind of their reach, so it falls across their outstretched arms. Keep clear as it pays out. Do not jump the gap. If the throw falls short, recover the line and recoil before trying again.
Practice question
Before throwing a mooring line, what do you do with its inboard end?
- Throw it as well, together with the coil
- Make it fast to a suitable cleat aboard
- Tie it securely around your own waist
- Leave it loose in the cockpit locker
Show the answer
Answer: B. Making the end fast prevents losing the whole line. Keep your feet clear and never tie the line to yourself.