
The ship: hull, engines and systems · Level R3 · 5 parts · about 15 min
The marine diesel engine
5 short parts: How it works · Fuel system · Cooling · Daily checks · Gauges & smoke. Each part explains the idea, then gives the points to remember, the common mistakes, a worked case and a practice question; the Academy unit adds all 30 check questions.
1 · How it works
The four-stroke diesel and compression ignition
A diesel squeezes air until it is hot enough to light the fuel. No spark plug: just air, fuel, compression and a sound electrical start.
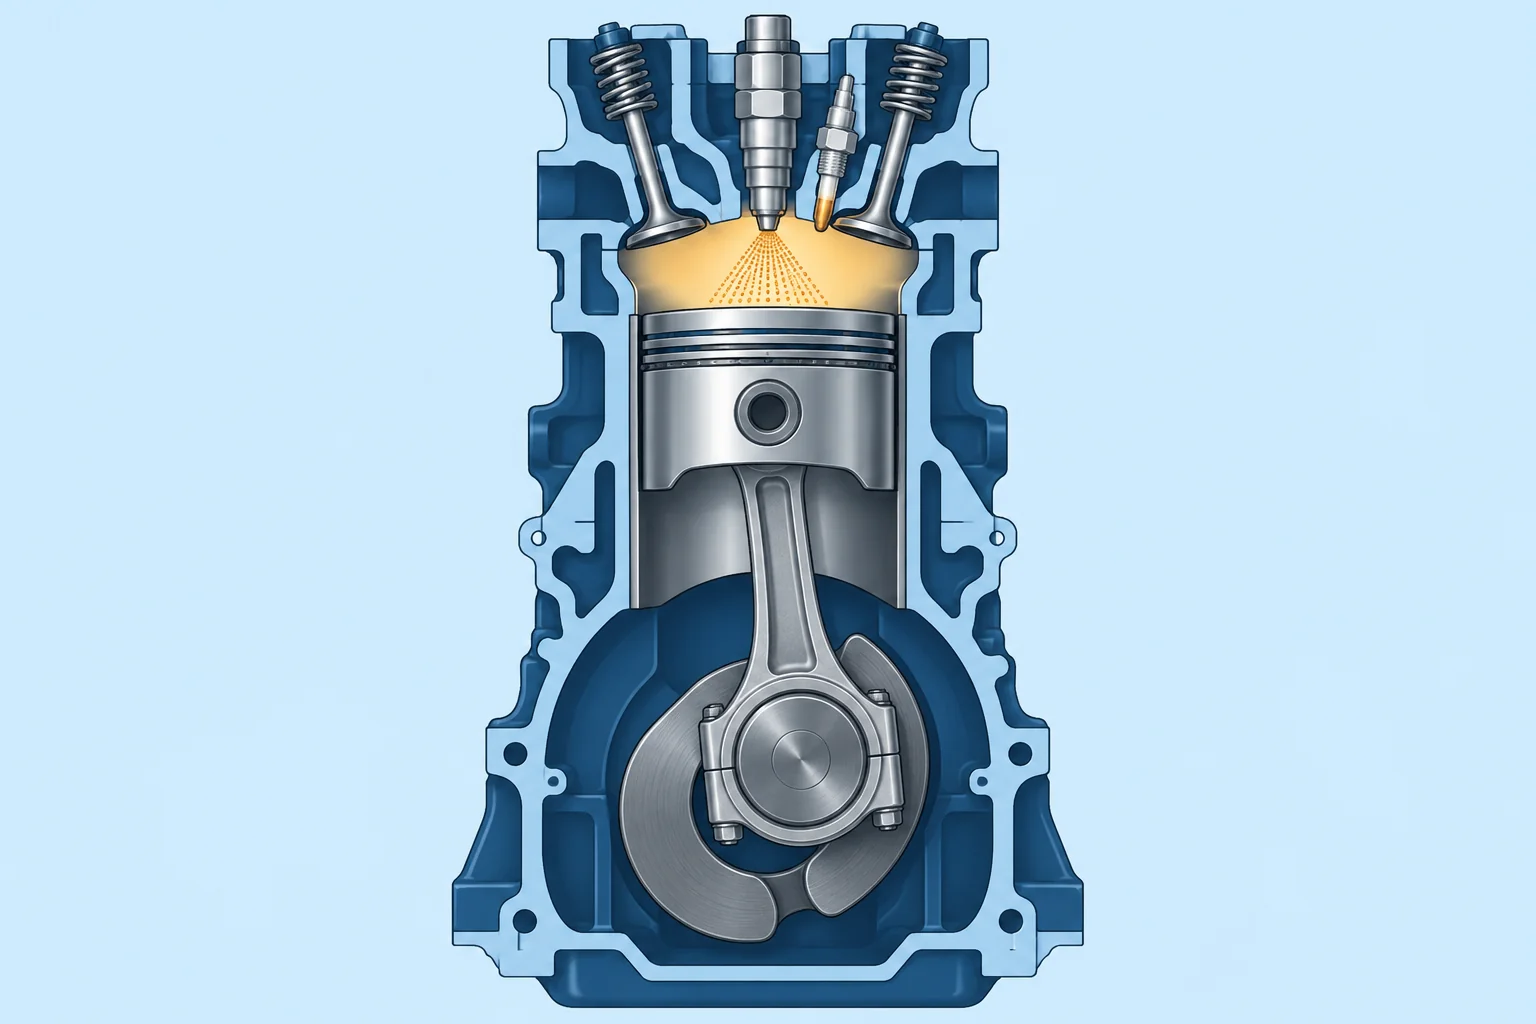
Compression ignition
A diesel has no spark plugs. The piston squeezes air to a small fraction of its volume, often 16 to 23 times smaller. The air gets very hot, well over 500 °C. Fuel sprayed in then lights by itself. This is compression ignition.
The four strokes
Induction: the piston goes down and draws in air. Compression: it rises and squeezes the air. Power: fuel is injected, burns and pushes the piston down. Exhaust: it rises again and pushes out the burnt gas. Two turns of the crankshaft give one power stroke per cylinder.
Main parts
A piston moves inside each cylinder, a round bore in the engine block. Connecting rods link the pistons to the crankshaft, turning their movement into rotation. The camshaft opens valves that let air in and exhaust out. The cylinder head closes the cylinders and holds the valves and fuel injectors. The flywheel is a heavy wheel that smooths rotation.
Cold starting
Cold air may not get hot enough to ignite fuel. Use glow plugs or an air heater, if fitted, for the time in the manual. Cranking means turning the engine with the starter. Follow the maker’s cranking and rest limits.
Stopping
A diesel normally stops when fuel injection is cut. A cable or an electrical stop solenoid may do this; electronically controlled engines stop injection through their control system. Know your engine’s normal and emergency stop methods.
Key figures
- Ignition
- Heat of compression: no spark
- Compression ratio
- Often about 16:1 to 23:1 in small diesels
- Four strokes
- Induction, compression, power, exhaust
- Power strokes
- One per cylinder every two crankshaft turns
Remember
- A diesel lights its fuel by heat of compression.
- Four strokes: induction, compression, power, exhaust.
- Use preheat in the cold; crank in short bursts.
- Normal stopping cuts fuel injection: know your engine’s stop methods.
Common mistakes
Wrong: A diesel that will not start probably has a bad spark plug.
Right: Diesels have no spark plugs. Check fuel, air in the fuel, battery and preheat.
Wrong: Keep cranking until it fires.
Right: Crank in short bursts. Long cranking flattens the battery, overheats the starter and can flood the exhaust with cooling water.
Worked case
On a frosty morning your diesel turns over slowly and will not fire. A crew member suggests holding the starter for a full minute. What do you do instead?
Show the answer
Stop repeated attempts. Check the battery and connections because the engine turns slowly, and check the fuel supply. Use the maker’s preheat, cranking and rest times. Repeated failed starts can fill a wet exhaust: follow the maker’s wet-exhaust starting procedure; see Cooling. Reopen any closed raw-water seacock immediately when the engine fires and check exhaust water.
Practice question
How does a diesel ignite its fuel?
- Using a timed spark plug
- Using a glow plug always lit
- By heat of compression
- Using a hot exhaust valve
Show the answer
Answer: C. The compressed air is hot enough to light the injected fuel.
2 · Fuel system
The fuel system and bleeding air
Clean fuel and no air: that is most of keeping a diesel running. Know your filters and how to bleed the system.
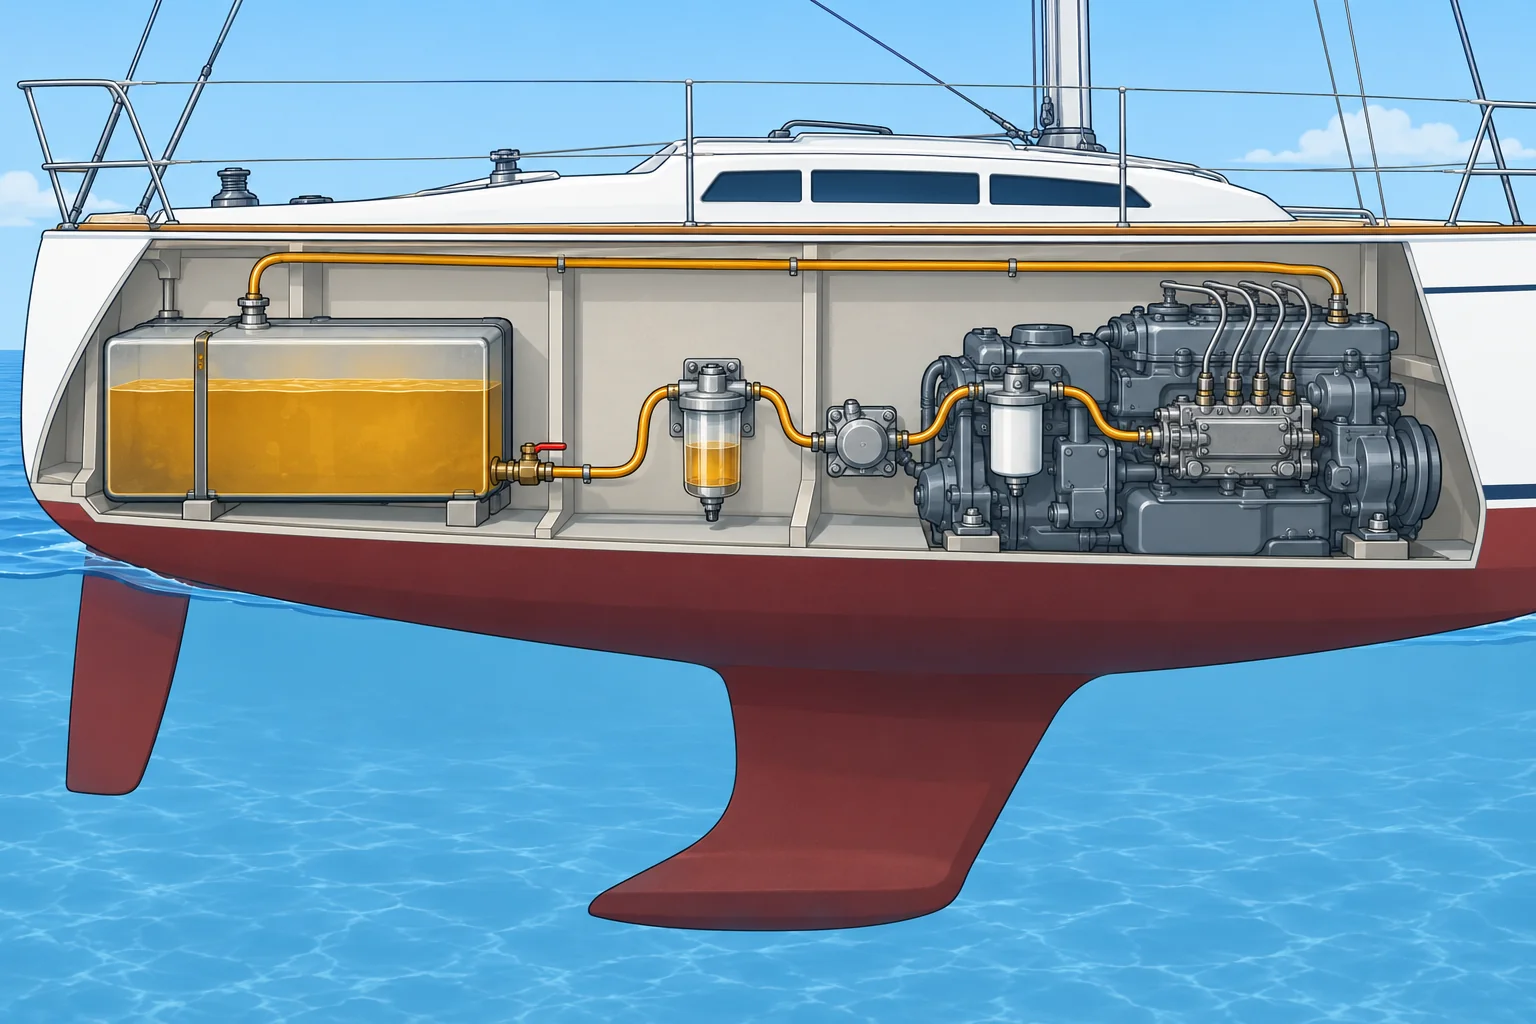
The fuel path
Fuel flows from the tank through a shut-off valve and the primary filter / water separator, which removes dirt and water. The lift pump moves it at low pressure through the finer secondary filter. The injection pump raises the pressure; injectors spray fuel into the cylinders. Surplus fuel returns to the tank.
Dirt and water
Water collects in tanks from condensation and bad fuel. Microbes, called diesel bug, grow where fuel meets water and make black slime that clogs filters. Drain the separator bowl regularly, store near full, leaving the maker’s specified expansion space, buy clean fuel and carry spare filters.
Air in the fuel
Air can interrupt fuel delivery and prevent injection pressure building. Running out of fuel, changing a filter or having a loose connection can let air in. Bleeding removes trapped air; priming fills the low-pressure circuit with fuel. Follow the maker’s low-pressure bleed points and priming method, working from the tank towards the engine. Many modern engines with an electric lift pump bleed themselves; follow the manual.
High-pressure danger
Injector pipes carry fuel at very high pressure. Some engines use common rail, a shared high-pressure pipe feeding the injectors. A jet from a leak can pierce skin and cause serious injury. Never feel for leaks or loosen common-rail pipes. Suspected fuel injection through skin needs emergency hospital treatment, even if the wound looks small.
Bleeding a diesel fuel system
- Check there is fuel in the tank and the fuel valve is open. Have rags and a container ready. — Bleeding from an empty tank only pumps more air.
- Identify the maker’s low-pressure bleed points and priming method. Prime the primary separator using its fitted primer or specified method; close its vent as instructed. — An engine lift pump cannot generally push fuel out of a bleed screw on its suction side; it may draw air in.
- At the designated low-pressure bleed point on the secondary filter, use the specified primer until bubble-free fuel appears; close the bleed screw. — Removing air here helps restore fuel delivery to the injection pump.
- Repeat at the injection pump’s low-pressure bleed point only if the manual specifies one. — Some pumps need their own bleed; others self-vent.
- Close all bleed screws and clean up spilled fuel before starting. Start as the manual directs. Never loosen common-rail or other high-pressure fittings for bleeding. If low-pressure bleeding fails, stop and get qualified help. — High-pressure fuel can penetrate skin; high-pressure bleeding is not a general skipper procedure.
- Once running, inspect visually for leaks from a safe distance. Stop before correcting any leak. — Keep clear of moving parts and high-pressure fuel. Spilled diesel is a slip and pollution risk.
Remember
- Path: tank → primary filter / separator → lift pump → secondary filter → injection pump → injectors.
- Drain the water separator and carry spare filters.
- Air can stop fuel delivery: bleed low-pressure points as the maker directs, from tank towards engine.
- Never feel for high-pressure leaks or loosen common-rail pipes. Injection through skin needs emergency care.
Common mistakes
Wrong: Start bleeding at the injectors because that is where the air ends up.
Right: Follow the maker’s low-pressure bleed points from the tank towards the engine. Never open high-pressure fittings for bleeding.
Wrong: A little water in the separator bowl can wait until the end of the season.
Right: Drain it as soon as you see it. If it fills fast, the tank is contaminated.
Worked case
Motoring in a rough sea, the engine falters, picks up, then stops. It cranks well but will not fire. You find black sludge in the primary filter bowl.
Show the answer
Rough water has stirred sludge (likely diesel bug) from the tank bottom into the fuel line and clogged the filter. Make the boat safe first: sail, anchor or call for help. Then change the primary filter, drain the separator, bleed the system from the filter onwards and restart. Expect it to clog again; carry spare filters and plan to clean the tank.
Practice question
Which component removes water and coarse dirt before fuel reaches the lift pump?
- The high-pressure injection pump
- The engine’s secondary fuel filter
- The primary filter and separator
- The high-pressure fuel injectors
Show the answer
Answer: C. The primary filter and separator catch water and dirt before the lift pump.
3 · Cooling
Cooling and the wet exhaust
Sea water cools the engine and the exhaust. Lose that flow and the engine overheats; let it siphon back and it floods.
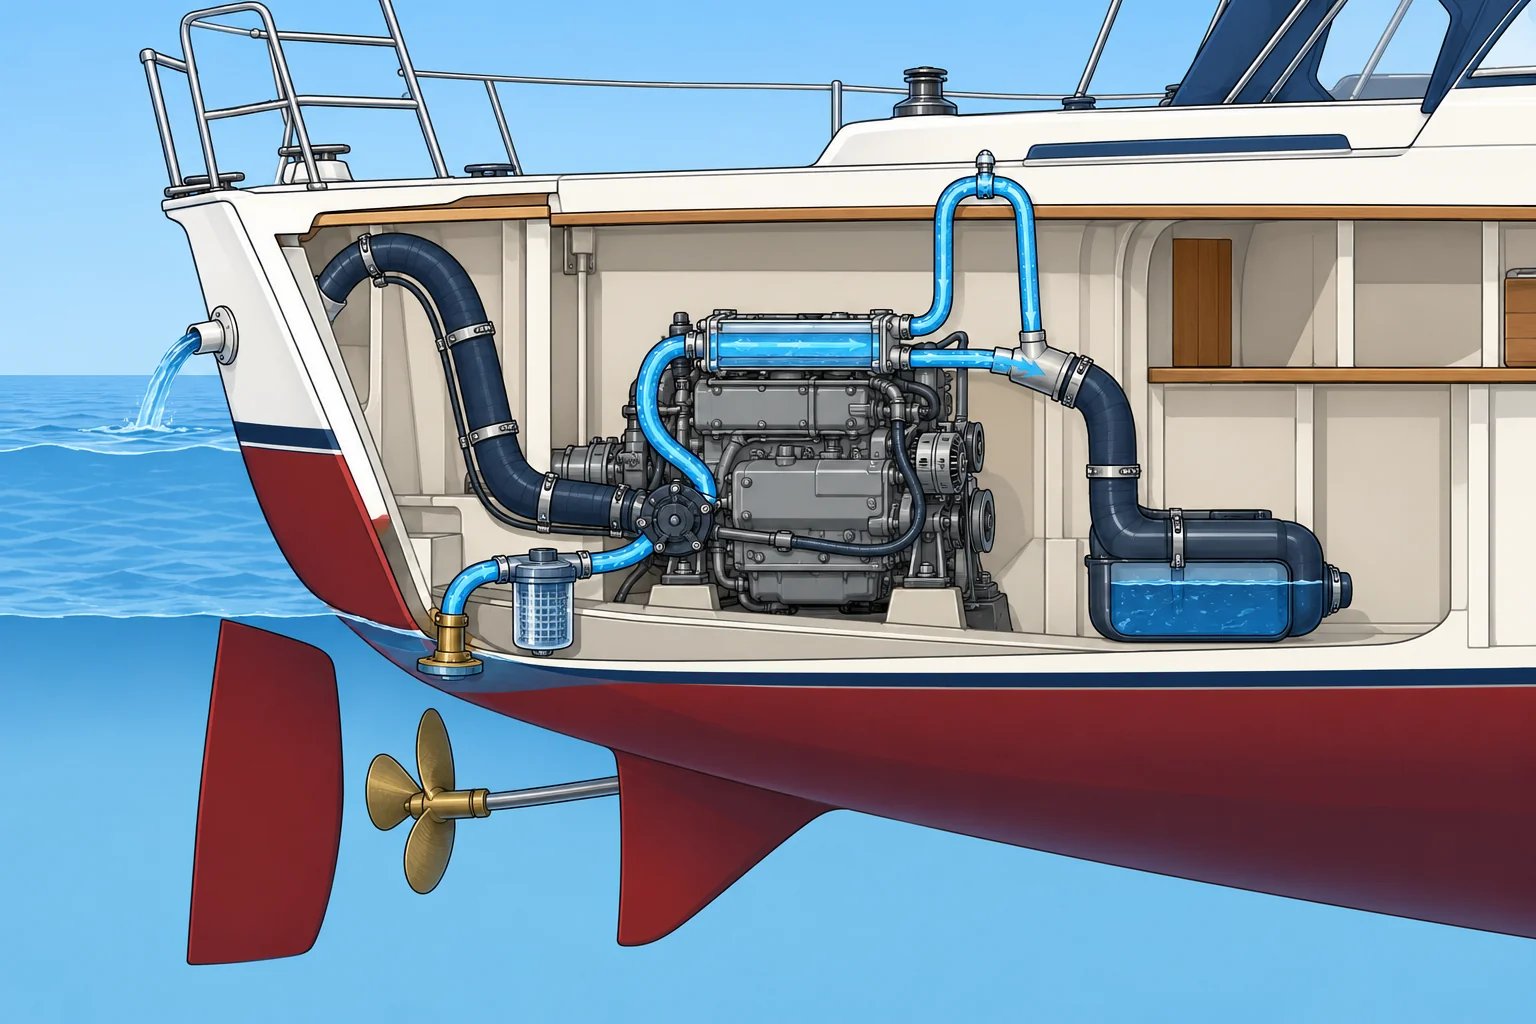
Raw-water circuit
Sea water, called raw water, enters through a seacock (sea-inlet valve) and a strainer (debris filter). An engine-driven pump with a rubber impeller, a rotating wheel with flexible vanes, pushes it through the heat exchanger, where it cools the engine coolant. It then enters the exhaust elbow and leaves with the exhaust. Check for exhaust water at every start.
Fresh-water circuit
Most engines are indirectly cooled: a closed circuit of coolant (fresh water with antifreeze) circulates through the block, a thermostat (temperature-controlled valve) and the heat exchanger. The raw water cools the coolant. Some engines are directly cooled by sea water. Check coolant only when cold; never open a hot cap.
The impeller
The rubber impeller is the weak point. It is destroyed in seconds if it runs dry, for example with the seacock closed. Replace it as the maker says, often each season, and carry a spare. If one breaks, find every missing piece: fragments block the heat exchanger.
Wet exhaust
Cooling water enters the exhaust at the injection elbow. A waterlock collects water draining back when you stop. Where siphoning is possible, a vented loop in the raw-water hose after the pump and before the exhaust injection elbow admits air through an anti-siphon valve to break it. It must stay above the highest operating waterline, including when loaded or heeled, with the maker’s required clearance. Keep its vent clear.
Flooding through the exhaust
Cranking pumps water into the waterlock without enough exhaust to clear it. Water can reach the cylinders. Stop repeated attempts and follow the maker’s wet-exhaust starting procedure. If it requires closing the raw-water intake, reopen it immediately when the engine fires. Do not keep cranking with the intake shut: the impeller runs dry. If water may already have entered the cylinders, do not crank again; get help.
Remember
- Raw water: seacock → strainer → impeller pump → heat exchanger → exhaust.
- Check for water at the exhaust at every start.
- An impeller dies quickly when dry: carry a spare.
- An anti-siphon valve breaks raw-water siphoning; it does not prevent flooding during repeated failed starts.
- Failed starts: stop and follow the maker’s procedure; reopen any closed seacock immediately on firing and check exhaust water.
Common mistakes
Wrong: Open the coolant cap to see why the engine is overheating.
Right: Let it cool first. Hot coolant under pressure can scald you badly.
Wrong: Without water at the exhaust, rev the engine to get the pump going.
Right: Stop at once. Check the seacock, strainer and impeller; a dry impeller fails in seconds.
Worked case
After starting, you see no water at the exhaust. A crew member suggests waiting for the temperature alarm. What do you do?
Show the answer
Stop immediately; do not wait for the alarm. Check that the raw-water seacock is open. Before opening the strainer or pump, prevent accidental starting and close the seacock. Clear the strainer; if necessary, inspect the impeller and recover missing vanes. Reassemble, reopen the seacock and restart only when the fault is corrected. Confirm exhaust water promptly.
Practice question
Which visible exhaust check must you make promptly after starting?
- Fuel showing on the tank gauge
- Water coming out of the exhaust
- Hours shown on the engine meter
- Colour of the oil filter casing
Show the answer
Answer: B. No water at the exhaust means no cooling: stop and check.
4 · Daily checks
Lubrication and the daily engine checks
Check water, oil, belts, batteries, leaks and exhaust each day. W-O-B-B-L-E helps you remember.
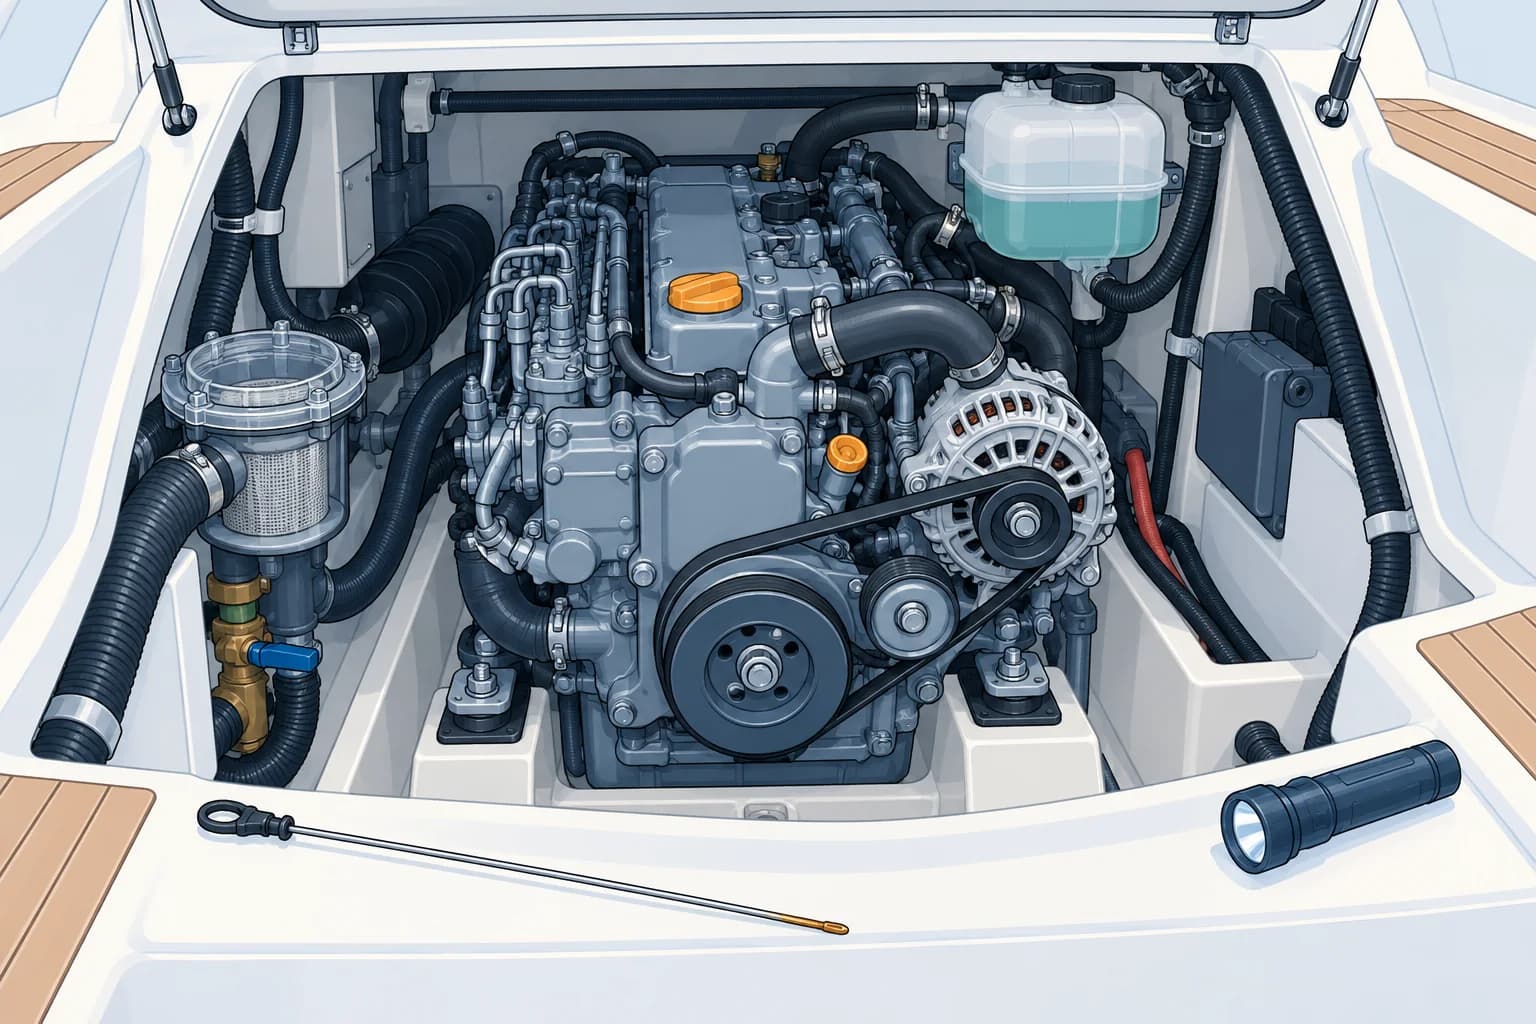
Lubrication
Oil collects in the sump, the reservoir under the engine. A pump sends it through a filter to bearings, which support moving shafts, and other moving parts. It then drains back to the sump. Oil reduces friction, carries heat and holds dirt for the filter. The oil pressure warning signals pressure below its set limit; stop immediately if it comes on while running. It does not measure oil level.
Reading the dipstick
Check the oil with the engine stopped for a few minutes and the boat as level as possible. Keep the level between the marks. Too low starves the bearings; too high can froth or be burnt. Milky oil means water or coolant is getting in: do not run it, find out why.
Belts and batteries
The belt drives the alternator, which charges the batteries, and often a water pump. With the engine stopped and starting disabled, inspect belts for cracks or fraying. Check tension using the maker’s method: the required deflection and checking force depend on the belt and its span. Make sure the battery switch is on and terminals are tight.
Light running
Long running at very low load, for example only charging batteries, can leave soot and promote bore glazing, a hard, smooth coating on cylinder walls. Use a suitable operating load or another charging source.
W-O-B-B-L-E check before starting
- Water: raw-water seacock open, strainer clear; coolant level correct (engine cold). — No cooling water means overheating within minutes.
- Oil: check engine oil is between the dipstick marks; do not start with milky oil. — Low or milky oil can wreck the engine.
- Belts: with the engine stopped and starting disabled, check belt condition and tension using the maker’s method. — A slack or broken belt stops charging and often cooling.
- Batteries: switch on, terminals tight, voltage normal. — A weak start battery is the commonest reason for not starting.
- Leaks: look under and around the engine for fuel, oil, coolant or water; check the bilge. — A new leak is a warning of a fault to come.
- Exhaust: after starting, check cooling water flows out and observe the smoke. If water is absent, stop immediately. — Confirms cooling and clean combustion before you leave.
Remember
- Use W-O-B-B-L-E before every first start of the day.
- Check oil with the engine stopped and the boat level.
- Milky oil = water or coolant in the oil: do not run it.
- Avoid prolonged running at very low load; use a suitable operating load or another charging source.
- Record unusual oil use, leaks or exhaust changes.
Common mistakes
Wrong: Check the oil straight after a long run.
Right: Wait a few minutes with the engine stopped so the oil drains back to the sump, then read it level.
Wrong: Charging batteries by idling for hours is good for the engine.
Right: Long light running can promote soot and bore glazing: hard deposits on cylinder walls. Use suitable load, or another charging source.
Worked case
During your morning checks the dipstick shows oil above the maximum mark, and it looks like coffee with milk. The coolant header tank is lower than yesterday.
Show the answer
Do not start. Milky oil and falling coolant suggest coolant is getting into the oil, for example through a failed head gasket or oil cooler. Running it can destroy the bearings. Note the levels, keep the boat safe in harbour and get a marine engineer to diagnose it.
Practice question
What does milky engine oil indicate?
- The oil is newly replaced
- Fuel is diluting the oil
- Water or coolant in the oil
- The oil filter was replaced
Show the answer
Answer: C. A milky emulsion means water or coolant is mixing with the oil.
5 · Gauges & smoke
Gauges, alarms and exhaust smoke
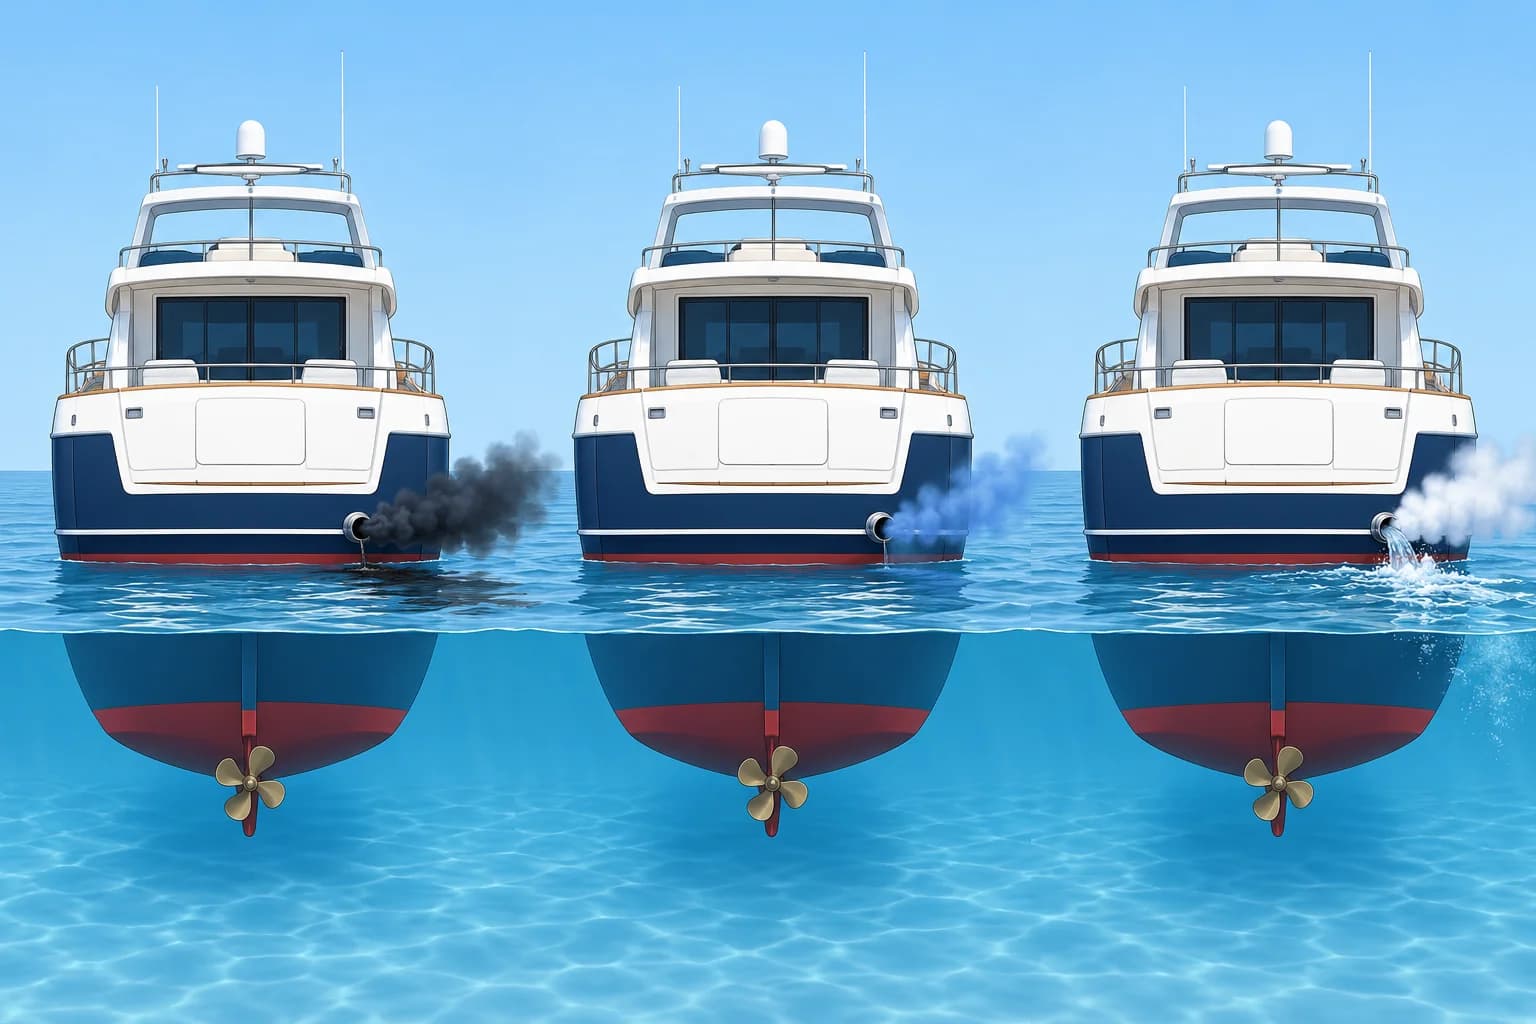
The panel and the exhaust tell you how the engine feels. Know what each alarm means and what each smoke colour says.
At switch-on
Check the lamps and buzzer using the maker’s test procedure. Oil-pressure and charge lamps normally light before starting. Oil pressure should establish promptly after starting; if its warning stays on, stop immediately. The charge lamp should go out at the maker’s specified engine speed. If it stays on, follow the charge-warning checks below.
Oil pressure alarm
Low oil pressure can leave bearings without enough lubrication. Stop the engine at once, then check the oil level once it has stopped. A few more minutes can destroy the engine.
Temperature alarm
Reduce load immediately. If exhaust water is absent or the wet-exhaust alarm sounds, stop at once. For coolant overheating with water still flowing, follow the maker’s procedure; stop if temperature stays high. Stop before inspecting cooling components. Open the coolant cap only when cold.
Charge warning
The charge light warns of a charging fault. A failed belt may also stop the coolant pump while exhaust water still flows. Reduce load and stop as soon as safe, disable starting and inspect the belt. Do not restart with a failed cooling-pump drive. Follow the maker’s procedure and conserve battery power.
Smoke colours
Black smoke suggests overload or insufficient air, for example from a fouled hull or propeller, a blocked air filter or faulty injectors. Blue suggests oil burning, from wear or excess oil. Brief white water vapour can be normal in cold air. White smoke can also be unburnt fuel, especially during cold starting. Persistent white smoke or steam, coolant loss or reduced exhaust-water flow needs investigation.
Key figures
- Black smoke
- Overload, fouled hull/propeller, air filter, injectors
- Blue smoke
- Burning lubricating oil
- White smoke
- White smoke may be unburnt fuel; brief vapour can be condensation
- Oil pressure alarm
- Stop the engine at once
- Temperature alarm
- No exhaust water/exhaust alarm: stop; coolant: follow manual.
Remember
- Check lamps and buzzer using the maker’s test procedure; know the normal start sequence.
- Low oil pressure: stop at once.
- High temperature: reduce load. No exhaust water or a wet-exhaust alarm: stop immediately.
- Black = overload or air; blue = oil; lasting white = water or unburnt fuel.
Common mistakes
Wrong: Keep going on a low oil pressure alarm to reach harbour.
Right: Stop at once. Use sails, anchor or call for help; the engine can seize in minutes.
Wrong: White smoke at every cold start means a blown head gasket.
Right: Brief white water vapour can be normal in cold air. White smoke may be unburnt fuel; persistent smoke or coolant loss needs investigation.
Worked case
At your usual cruising setting, the boat is slower and makes thick black smoke. Temperature is normal. A crew member suggests more throttle to regain speed. What do you do?
Show the answer
Reduce power until the smoke clears; do not add throttle to force the usual speed. Black smoke suggests overload or insufficient air, but does not identify the cause. Check the air intake and arrange a safe hull and propeller inspection. Normal temperature does not rule out a problem.
Practice question
The low oil pressure alarm sounds while the engine is running. What do you do?
- Reduce to half engine power
- Stop the engine at once
- Top up the engine coolant
- Increase the revs briefly
Show the answer
Answer: B. Without oil pressure the bearings can fail in minutes.